20 weeks down… 20ish more to go!

I just can’t believe that we’re halfway done already!

I know pregnancy is never the same as when it’s your first, but I just can’t believe how much faster each pregnancy seems to go than the one before.

I’m still processing the fact that we are having a GIRL, but I am so excited!

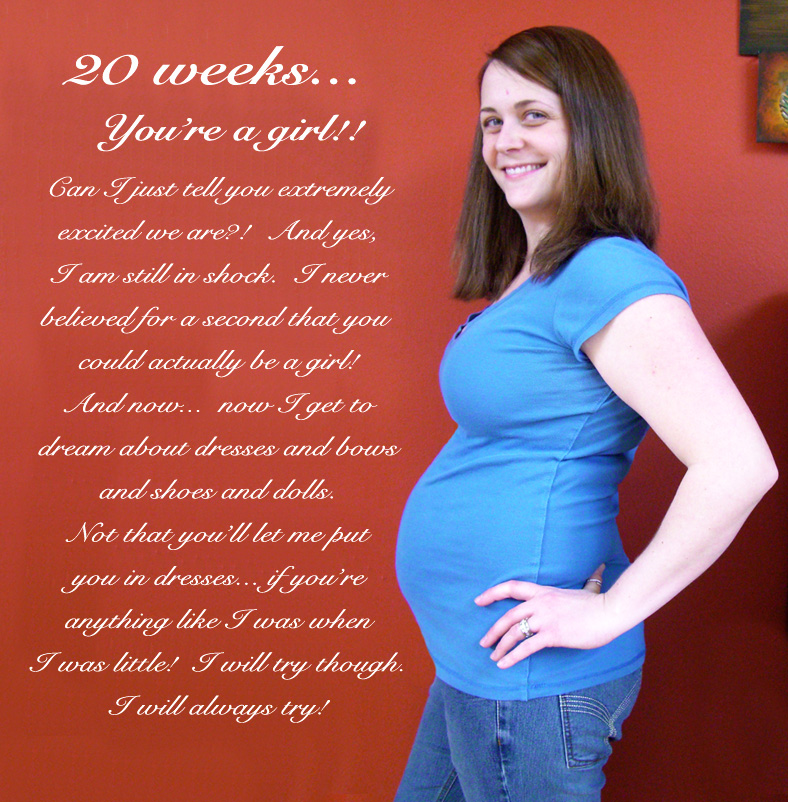
I think some small part of me will never fully believe it until I see her with my own eyes.

:o) Just call me an excited skeptic, I guess!

Oh, and according to The Bump, Baby Girl is now the size of a cantaloupe…

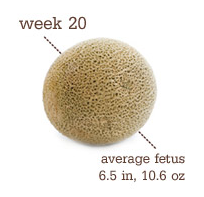
Can you believe it?!

almond dark chocolate chip cookies

Sometimes a plain old chocolate chip cookie is exactly what you need.

And sometimes it just won’t cut it.

The idea is still there, but you just need a little more ‘oomph’, you know?

Well that’s where these cookies come in!

Dark chocolate chips and drizzle, and a hint of almond in the dough makes these a grown-up version of our favorite classic treat.

I love almond flavoring so much. Almond mochas, Sandbakkelse (norwegian almond butter cookies), and a whole slew of other almond treats live at the top of my Favorites List.

It’s hard for me to pass up any treat that has almond in it!

My husband, unfortunately does not agree. So, I think you’ll find a subtle flavor in these cookies… since I didn’t want to scare him away from eating some.

Try these next time you are craving chocolate chip cookies… but with a twist!

Almond Dark Chocolate Chip Cookies Recipe

Ingredients:
2 cups + 2 tablespoons flour
1/2 teaspoon baking soda
1/2 teaspoon salt
3/4 cup butter, melted and cooled slightly (still warm)
1 cup firmly packed brown sugar
1/2 cup sugar
1 large egg
1 egg yolk
2 teaspoons almond extract
1 1/2 cups dark chocolate chips
additional dark chocolate for drizzle, optional

Directions:
Preheat the oven to 325ºF. Line 3 baking sheets with parchment paper.

In a small bowl, whisk together the flour, baking soda & salt; Set aside.

In your mixer bowl, cream together the warm butter and sugars until light and fluffy, at least 3 minutes. Beat in the egg, egg yolk & almond extract until smooth.

Beat in the flour mixture until just combined and then stir in the chocolate chips.

Take about 1/4 cup of the dough and form it into a ball in your hands. Hold the ball in both hands and gently break it apart (like you are cracking an egg!) and set the dough pieces craggly-side up on the baking sheet. (You now have 2 cookies from that 1/4 cup of dough).

Repeat until all the dough is gone, allowing plenty of space in between cookies on the sheets so that they have room to spread.

Bake for 10-15 minutes, depending on your oven and the size of your cookies - until the cookies are barely golden brown around the edges… being careful not to over-bake them.

Remove them from the oven, leaving the cookies on the baking sheets until they have firmed up enough to lift off the pans… around 5-10 minutes.

Once the cookies are completely cool, you may drizzle them with some melted dark chocolate, if you’d like!

Store in the freezer for best results!

tomato feta salad or bruschetta

This bright, fresh salad of tomatoes, feta and herbs is summer in my mouth.

I know it’s not summer yet, but in this dreary, cold, damp Pacific Northwest, I really really needed some summer in my life!

Of course you can usually get good tomatoes year-round at the market, so this salad can be made anytime you like…

But can you just imagine how amazing it would taste with tomatoes and herbs fresh from your summer garden?

Even my tomato, feta & vinegar hating husband loves this salad, even though he doesn’t like to admit it.
When I make it and put it in front of him, it’s not long before the whole bowl is gone!!

Tomato Feta Salad Recipe
Serves 4-6

Ingredients:
6 cups seeded, diced tomatoes (or 3 pints cherry tomatoes, halved)
3/4 lb crumbled feta (preferably French goat feta)
1/2 large onion, finely chopped
6 tablespoons white wine vinegar
1/2 cup good extra-virgin olive oil
1/2 cup basil leaves, chopped
1/2 cup italian parsley, chopped
salt & pepper, to taste

Directions:
Gently toss together the tomatoes, feta and onion in a large bowl.

Add the vinegar, oil, basil, and parsley; Toss gently again and season to taste with salt and pepper.

Serve at room temperature with sourdough toasts or fresh french bread slices.

You can mix this salad up so many ways… My favorite is tossed with a bunch of chopped fresh romaine.

You could also mix it with cooked, cooled pasta or quinoa for a great summer potluck dish. Or of course it is amazing just the way it is!

Halve this recipe if you’d like, but I doubt you’ll have any problem finishing it off!

Come share in the tomato love at the Tomato Love Recipe Exchange, hosted by Gimme Some Oven & Bake Your Day, sponsored this week by KitchenAid. Also visit Recipe for Change to learn more about how to support tomato farmers.

chewy lemon bars

These sweet, easy chewy lemon bars (cutely dubbed “Lemonies” by the original author!) are what I would imagine the love child of a brownie and a lemon bar to be.

The tangy sweet flavor of a lemon bar, with the dense, rich texture of a brownie… all covered in a sweet-tart lemon glaze!

So delicious and so simple to throw together.

Lemony treats are my favorite.

I know I have a lot of favorites, but lemony things really are my favorite favorite.

Obviously when I saw this recipe on Pinterest the other day, I knew I had to try it soon.

I just so happened to have a big bowl full of lemons in my fridge (did you know how cheap it is to get a big bag of them at Costco?!) and needed something to photograph with my new camera…

So here you go!

(I absolutely adore these bars. I will be making them often. More than often. My family and friends will most likely get sick of them long before I do. I never get tired of lemons!)

chewy lemon bars

Ingredients

    for the bars:
  • 1 1/2 cups flour
  • 1 1/2 cups sugar
  • 1/2 teaspoon salt
  • 1 cup butter, melted & slightly cooled
  • 3 large eggs
  • 1/2 teaspoon pure vanilla extract
  • 2 tablespoons fresh squeezed lemon juice
  • 1 teaspoon packed lemon zest (from 1 lemon)
  • for the glaze:
  • 1 cup powdered sugar
  • 3 tablespoons fresh squeezed lemon juice
  • 1 teaspoon packed lemon zest (from 1 lemon)

Directions

Preheat the oven to 350ºF. Butter a 9x13" glass baking dish.

In a large bowl, whisk together the flour, sugar & salt. Mix in the melted butter until combined.

In a separate bowl, whisk together the eggs, vanilla, lemon juice & zest until combined. Mix this into the flour mixture combined and smooth.

Spread the batter into the prepared baking dish and bake for 30-40 minutes until just set, golden and a toothpick inserted in the center comes out clean.

Let the bars cool completely in the pan before glazing.

In a small bowl, whisk together the lemon juice, zest and powdered sugar for the glaze until smooth. Pour over the cooled lemon bars and refrigerate until nice and firm before serving!

http://sweetannas.com/2012/03/chewy-lemon-bars.html

adapted from Rita’s Recipes

Isn’t this little guy adorable? He was sick with a fever yesterday and he didn’t eat any lemon bars, but he was just so excited that I was even making “hownies” that I don’t think he cared!

cabbage roll soup

Ok, so this is actually very similar to my Hamburger Soup that I learned from my mom years ago.

I just realized as I started making it for dinner that it very closely resembles the flavors and ingredients of a cabbage roll, so I decided to roll with that!

You could also add some rice or quinoa to this, if you like. I never feel that it’s lacking without, but I have considered putting some quinoa in and probably will try it that way at some point soon!

Cabbage Roll Soup Recipe

Ingredients:
2 pounds ground beef
1-2 tablespoons olive oil
1 large onion
2-3 ribs celery, chopped
2-3 carrots, chopped
2 cloves garlic, minced
1 large head of green cabbage, chopped
2 (64oz each) cans or bottles of V-8 juice (I like Spicy best, but use whatever I have!)
salt & pepper, to taste
chipotle chili pepper, or cayenne pepper, to taste

Directions:
In a large pot over medium-high heat, brown the beef - breaking it up into small bits as it cooks - until it is no longer pink and the fat has cooked off. Drain off the fat and return the pot to the stove.

Stir in the olive oil and then the onions, celery, & carrots and cook until the veggies are soft and fragrant. Stir in the garlic, cooking for a few seconds, and then stir in all of the V-8 juice.

Turn the heat up to high and bring the soup to a boil. Once it is boiling, stir in the chopped cabbage and some of the spices (easy on the salt until the end… the V8 can be plenty salty as it is!), cover and reduce the heat to low. Simmer for at least 3 hours or all day.

Taste for seasonings, add more if needed and serve!