slow cooker turkey taco soup

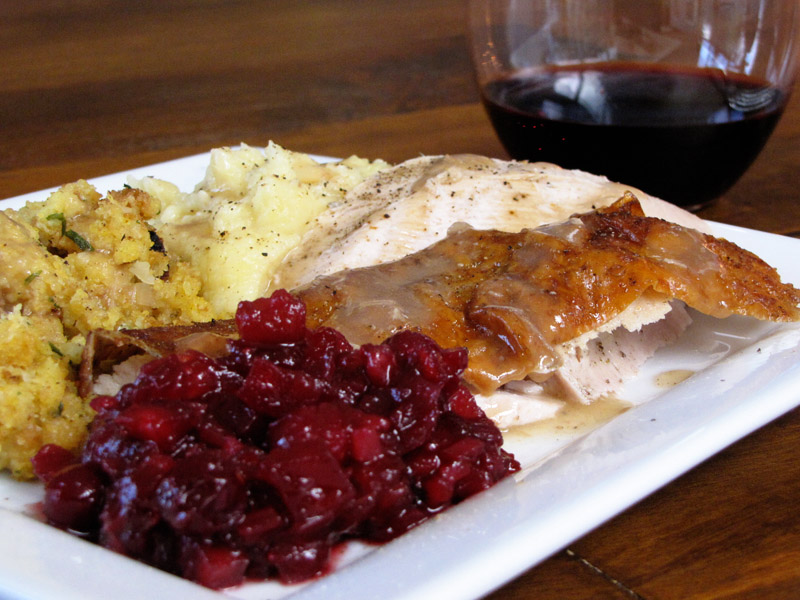
Ok… back to the Thanksgiving Leftovers topic. Because I can’t be the only person that still has a bunch of leftovers, right? Right?!

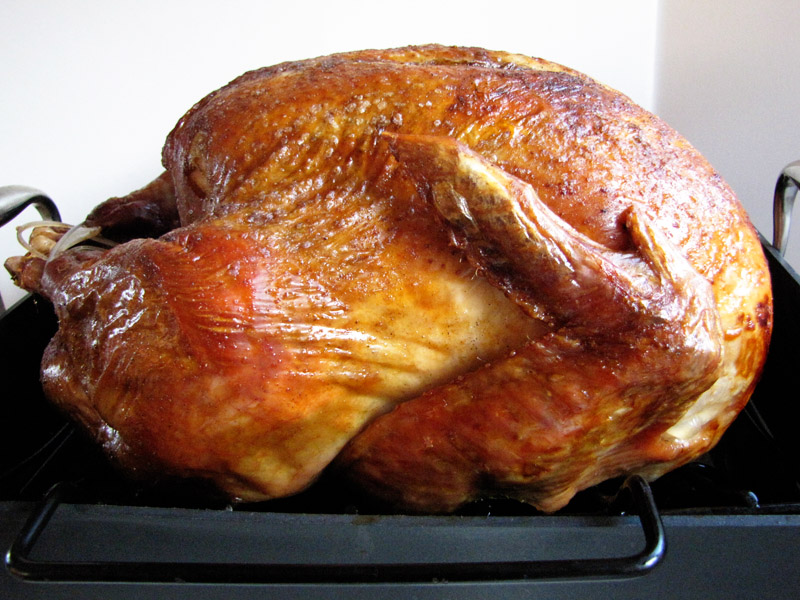
Remember I told you we cooked 2 turkeys in 2 days?

Well, in case that didn’t make it clear for you, we have a lot of leftover turkey!

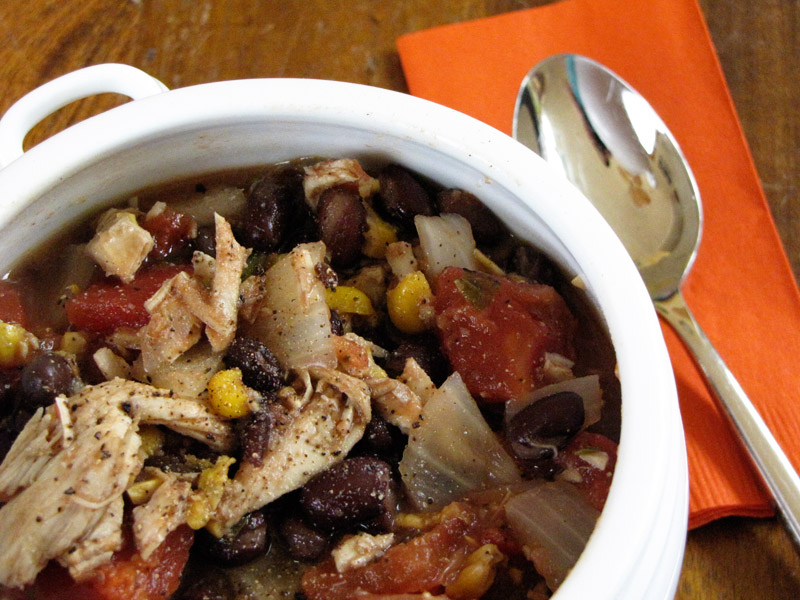
This hearty crockpot “stoup” (as Rachael Ray would call it!) is definitely more than just a soup… it is an entire meal in a bowl!

In the words of my husband “I don’t even need crackers for this soup!”

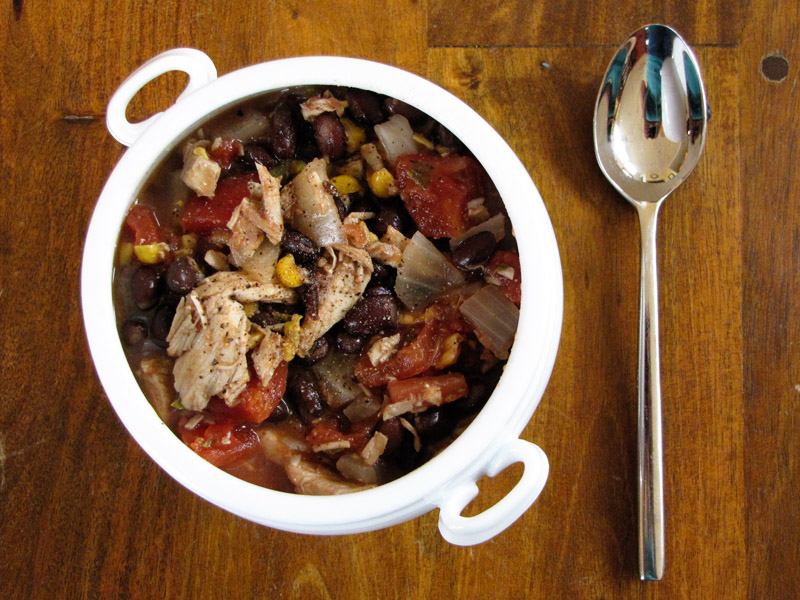
Give this a try with some of that last leftover turkey! (Or feel free to use raw or cooked chicken if you’re out-o-leftovers!)

Slow Cooker Turkey Taco Soup Recipe

Ingredients:
3 cups chopped or shredded leftover turkey (or chicken, or raw chicken!)
2 cans black beans, rinsed
1 can cream-style corn
1 (28oz) can diced tomatoes
1 (4oz) diced green chiles or jalapeños
1/2 large onion, diced
2 teaspoons cumin
1 teaspoon garlic powder
1 teaspoon dried oregano
1/4 teaspoon chipotle chili powder
salt & pepper, to taste

Directions:
Dump all the ingredients into the slow cooker. Turn on LOW and cook for 6-8 hours or longer!

Serve with chips, shredded cheese, sour cream, guacamole… whatever you like on your tacos!

This is a running list of tips I think you might find helpful.

(Check back often for updates!)

Questions? Comments? Suggestions? Tips that I should include here?? Email me!

sweetannasblog[at]gmail[dot]com

#1: My slow cooker is 5 quarts. I guess that’s not a tip, so much as a tidbit. If yours is bigger or smaller, adjust recipes accordingly if you’d like! (Email me if you need help on that!)

#2: When you need to spray a dish with cooking spray: Open the dishwasher door and set the dish on the open door. Spray. (All the mess stays right in the dishwasher to be cleaned with the next load!)

#3: ”Room Temperature” or “Softened” butter is butter that is soft enough to press gently and leave a good finger indent, but not soft enough to squish your finger right through. (That made me smile… squishing butter sounds fun.) Too soft? Put it back in the fridge to set up a bit before using!

super-creamy stove top mac & cheese

I know I make macaroni & cheese a lot… but what can I say. We love homemade mac & cheese around here!

I have several versions that I shuffle around depending on my mood, the rest of the dinner plans and how much work I want to do…

&

They are all easy, but easy in different ways.

This version is a super creamy stove-top mac & cheese that has so much flavor… I really do think it is my favorite of all of them!

But of course none of us agree, so try them yourself and decide!

And if you’ve already tried any of these… let me know! Which one is your favorite?

Super-Creamy Stove Top Mac & Cheese Recipe
adapted from Food Network
Servings: 6-8, depending on accompaniments!

Ingredients:
1 pound penne pasta (or other short pasta)
1/2 cup butter
1 cup finely chopped onion
1/2 cup flour
2 - 3 cups chicken stock
1/2 cup heavy cream
2 cups shredded cheddar cheese
salt & pepper, to taste
1/4-3/4 teaspoon chipotle chili powder (to taste)

Directions:
Boil the pasta according to the package directions. Reserve 1/2 cup of the pasta water and then drain the noodles and set them aside.

While the pasta is cooking, melt the butter in a large saucepan over medium heat. Add the onion and sauté until very soft and translucent, about 10 minutes.

Sprinkle in the flour, stirring constantly, and continue to stir and cook until light golden brown, smooth and pasty. (Congratulations!! You just made a roux! Aren’t you proud of yourself?!)

Stir in the chicken stock (start with 2 cups, add more if you need it at the end!) until you have a smooth sauce and simmer a few minutes until thick. Stir in the heavy cream and then the cheese until melted. Season, to taste, with salt & pepper and chipotle chili powder.

Gently stir in the pasta, adding a bit at a time of the reserved pasta water if needed, until the sauce is creamy and the noodles are coated to your liking.

(You can stir in some leftover cooked ham at this point, if you have any, like I did… it’s so good together!)

peppermint Oreo truffles

These Peppermint Oreo Truffles are so fun and festive!

With only 5 ingredients, and just a few minutes of your time, you can enjoy these luscious goodies and have plenty to share!

Try these. Really. Please… I’m begging you.

Ok, maybe I’m not. But just do it. You’ll be happy you did!

(Or at least, your family will be happy you did!)

I threw this batch together super-quick and so they are quite… rustic looking. :o)

Normally I would be a little more careful and dainty with my dipping process.

Either way, they still taste great!

peppermint Oreo truffles

Ingredients

  • 1 (16.6oz) package regular Oreo cookies (not double-stuffed)
  • 6 regular-sized candy canes, unwrapped and finely crushed
  • 1 (8oz) package cream cheese, room temperature
  • 2 cups chocolate chips
  • 1 tablespoon vegetable or coconut oil

Directions

Place all the Oreo cookies in the bowl of your food processor and pulse until they are finely ground.

Set aside a few tablespoons of the crushed candy canes and then dump the rest and the block of cream cheese into the food processor. Continue to pulse until the mixture is well combined and smooth.

(You can do this in a mixer or by hand, of course... I just find that the food processor makes the quickest work of it! If you're not using a food processor, crush up the Oreos in a ziploc bag before mixing!)

Place the mixture into the fridge to firm up a little for about 30 minutes to an hour.

Line a cookie sheet with parchment or waxed paper. Take the truffle mixture out of the fridge and scoop and roll equal sized balls, placing them onto the tray as you go.

Once your tray is full, place the truffles in the freezer to chill for at least an hour or up to a day.

When you're ready to coat, carefully melt the chocolate chips and vegetable oil in the microwave, stirring well every 30 seconds, until smooth.

Drop each truffle into the melted chocolate and coat evenly with a fork, gently tapping off the excess chocolate. Place the now-dipped chocolate truffle back on the tray and immediately sprinkle with a pinch of crushed candy canes. Repeat until all the truffles are dipped & sprinkled!

Store the truffles in the fridge, in an airtight container. The peppermint flavor comes out even more after several hours of being in the fridge!

http://sweetannas.com/2011/11/peppermint-oreo-truffles.html

adapted from Kraft Foods

perfectly moist convection oven roasted turkey

I know, I know… calling something perfect is pretty bold. But this really is the best, juciest turkey I have ever made. And there just isn’t any better way to say it!

I used my convection oven for the first time this Thanksgiving.

No, I didn’t get a new oven… I’ve just never used the convection feature on my oven before. Why? I dunno. It’s just foreign to me, I guess.

And now I’m wondering… Do you use a convection oven? And if so, why do you like it better than your regular oven??

Ok, back to the turkey.

This turkey was amazing. Plain and simple. Juicy, tender… full of flavor. And the 20-pound beast was cooked in less than 3 hours! YaY convection!!

Of course, cooking a turkey varies a bit depending on how big it is, but mine was close to 20 pounds (as many of them are!) so we’ll use that as our base. If you’re turkey’s smaller, start checking for doneness earlier, and if it’s bigger, give it a bit more time! (Rocket science, eh?)

Anyways… I know this is a little late for the big day, but if you’re like me and you tend to stock up on turkeys while they’re cheap (.89 cents a pound anyone?), try this out!

Oh, and if you don’t have convection on your oven… raise the end cooking temp to 350º and expect the turkey to take a bit longer!

Perfect Convection Roasted Turkey Recipe

Ingredients:
1 20-lb turkey, thawed
1/2 cup butter, softened
2 tablespoons poultry seasoning
2 teaspoons salt
1-2 large onions, quartered (skin on is fine!)

Directions:
Preheat the oven to 400ºF. Set the rack into your roasting pan and put it by the sink. (If your roasting pan doesn’t have a rack, you can use several balls of aluminum foil or halved onions to keep the turkey from sitting in it’s juices).

In a small bowl, stir together the softened butter and poultry seasoning until combined; Set aside.

Remove the neck & innards (ewww… I hate that word!) from the turkey and rinse the whole turkey in cold running water, inside and out. Set it into your roasting pan and pat dry with paper towels.

(Ok, now this is the gross part:) Slide your hand in between the skin and the meat on the breast of the turkey, loosening the skin all over. Take the butter mixture and spread it all over in between the skin and the meat, and on top of the turkey, rubbing it in all over and using every last bit of it.

Sprinkle the salt all over the turkey and inside the cavity. Place the onions inside the turkey cavity.

Place the turkey in the preheated 400º oven for 20-30 minutes, until nice and golden brown all over.

Lower the heat to 325º (on your convection - roast setting). Place a sheet of aluminum foil loosely on top of the turkey covering the breast and top of the legs. Cook for another 2 hours… checking the temperature every once in a while at the end (using a meat thermometer in the deepest part of the breast, not touching bone!) until it reaches 165º.

Remove from the oven, cover with foil to keep warm (and finish cooking the last 5 degrees from carry-over heat) while you heat up everything else for the meal.

Carve and serve with all the trimmings!!

Disclaimer: I sincerely apologize for not bringing this to you before Turkey Day… I just couldn’t cook another turkey, since I’m cooking two in two days this week! But, now you have it for Christmas and you can bookmark it for next year!