slow cooker barbeque beef sandwiches

On most chilly fall mornings I wake up thinking about what I can put in the slow cooker for the day… something about the smells filling up the house all day just makes the cold seem cozier!

This time, for inspiration, I went out to the freezer in the garage to see what we had in there. I found a couple of packages of rib steaks and decided to throw them in the slow cooker with a homemade barbeque sauce for shredded beef sandwiches.
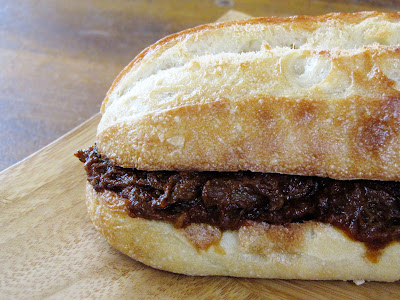
It smelled great all day, and tasted even better!

Slow Cooker Barbeque Beef Sandwiches Recipe
Ingredients:
1/2 cup ketchup
1/4 cup vinegar (cider, white wine or red wine vinegar)
1/3 cup firmly packed brown sugar
6 oz tomato paste
2 tablespoons worcestershire sauce
2 tablespoons yellow mustard
1 1/2 teaspoons salt
1 teaspoon onion powder
1/2 teaspoon garlic powder
1/4-1/2 teaspoon chipotle chili powder (to taste)
3 lbs or so beef roast (pork would work great too!)
Directions:
Mix together all of the ingredients, except for the meat, in the slow cooker, stirring well to combine.
Cut the meat into large chunks and place into the slow cooker, turning the pieces to make sure everything is coated with the sauce.
Cook on low for 6-8 hours, or until the meat is tender and falling apart. Shred the meat and return to the sauce to keep warm.
To serve, toast your favorite buns until golden brown and pile with meat! Also great with a few slices of cheese thrown onto the bread before you toast it… yumm!

36 weeks!

We’re getting so close! As of today, this baby is in the clear to come whenever he wants!

Now, I would love for him to stay in until he is good and ready… but if he happens to be good and ready a little sooner than 40+ weeks, that would be fine with me! :o)

I am so excited I can hardly stand it! We can’t wait to meet you, sweet boy!!

sour cream sugar twists (aka starlight sugar crisps)

Some of my favorite recipes for the holidays come from my grandma’s kitchen… and more specifically from her 1950′s copy of Pillsbury’s Best Butter Cookies Vol II (no date, but the price on the cover is 20 cents!).

Since I get to start my holiday baking quite early this year (you know, because my hands will be full come the end of november!!) I was excited to make one of my favorite holiday treats! Fortunately these freeze wonderfully, otherwise I would have a hard time not eating them all… right now!

In my family, we have always called these cookies Sour Cream Sugar Twists. I actually didn’t know they had a different name until I saw the recipe in the pillsbury cookbook!

So yes, these are officially called “Starlight Sugar Crisps” but to me they will always be Sour Cream Sugar Twists.

Sour Cream Sugar Twists (Starlight Sugar Crisps) Recipe
“Senior First Prize Winner in Pillsbury’s 8th Grand National Recipe and Baking Contest by Mrs. Leland E. Ross, Roscommon, Michigan”

Ingredients:
2 1/4 teaspoons active dry yeast
1/4 cup very warm (but not hot! about 105º) water
3 3/4 cups flour (spoon gently into your measuring cup)
1 1/2 teaspoons salt
1 cup cold butter, diced
2 large eggs, beaten
1/2 cup sour cream
1 teaspoon pure vanilla extract
1 1/2 cups sugar
2 teaspoons pure vanilla extract

Directions:
Stir the yeast into the warm water and set aside to soften. In a large bowl whisk together the flour and salt. Cut in the butter until particles are the size of small peas. Blend in the eggs, sour cream, 1 teaspoon vanilla and the softened yeast. Mix thoroughly. Cover and chill at least 2 hours (or up to 4 days).

Preheat the oven to 375ºF. In a small bowl, combine sugar and 2 teaspoons vanilla, stirring well to combine.

Roll out half of the chilled dough on a board that has been sprinkled with about 1/2 cup of the vanilla sugar. Roll out to a 16×8″ rectangle. Sprinkle with about 1 tablespoon more vanilla sugar.

Fold one end of the dough over the center. Fold the other end over to make 3 layers. Turn 1/4 way around and repeat rolling and folding twice, sprinkling the board and dough with additional vanilla sugar as needed.

Roll out to a 16×8″ rectangle about 1/4″ thick. Cut into 4×1″ strips. Twist each strip 2 or 3 times and place on parchment-lined baking sheets. Bake 15-20 minutes, until the cookies are light golden brown. Repeat the entire process with the remaining dough.

Come join the fun at the My Baking Addiction and GoodLife Eats Holiday Recipe Exchange sponsored by Red Star Yeast!

eggnog frosted nutmeg cookie logs

When I start anticipating the holiday season each year, I get excited about all the smells and treats and the memories that go along with them.

To me Christmas is eggnog lattes, sour cream sugar twists, kransekake, lefse, krumkake, satsumas, rømmegrøt, and these cookies… a recipe from the 1950′s Pillsbury’s Best Butter Cookie Cookbook that I have updated slightly to have even more of an eggnog flavor!

Everything we love about eggnog in a fun ‘snow-covered-log’ cookie, these treats are always at the top of my list of Christmas baking!

Nutmeg Cookie Logs (with Egg Nog Frosting) Recipe

Ingredients:
for the cookies:
3 cups all-purpose flour
1 teaspoon nutmeg
1 cup butter, softened
3/4 cup sugar
1 large egg
2 teaspoons pure vanilla extract
2 teaspoons rum flavoring
for the frosting:
3 tablespoons butter, softened
1 teaspoon pure vanilla extract
2 1/2 cups powdered sugar
2-3 tablespoons eggnog
nutmeg, for sprinkling

Directions:
Preheat the oven to 350ºF. In a medium bowl, stir together the flour and nutmeg to combine.

In your mixer bowl, cream together the butter and sugar until light and fluffy. Beat in the egg, vanilla and rum until well combined.

Slowly mix in the flour mixture, blending well. (This is a somewhat firm dough, and should mix up into a big ball).

On a lightly floured surface, roll pieces of the dough into long logs, about 1/2″ in diameter. Cut into 3″ pieces and place the pieces on parchment-lined baking sheets.

Bake for 12-15 minutes, or until the cookies are just barely golden brown. Cool completely on a cooling rack before frosting.

To make the frosting: Cream together the butter and vanilla. Beat in 1/2 cup of the powdered sugar, 1 tablespoon eggnog, 1 cup powdered sugar, 1 tablespoon eggnog, 1 cup powdered sugar and the remaining tablespoon of eggnog (if needed) - beating well between each addition until you have a nice spreading consistency. Spread some frosting on the top of each cookie, and then sprinkle

This frosting will set up and not be too soft, making these cookies easy to store and transport. These also freeze wonderfully, and can be made weeks in advance!

aprons and smiles…

Yesterday Bjørn came up to me with one of my aprons and begged for me to help him put it on. (Well… grunted and whined actually, but you get the point!)

He then proceeded to wear it around the house for the next hour, always making sure I was watching, and giving me these great cheesy grins!

Goofy facial expressions are a new thing for him lately, and they are so much fun! I was excited to finally get them on camera!

He was obviously having a great time… don’t you think?

And here are the serious big brown eyes that we all know and love…

Oh, I just love this little boy so much!